|
Lighting
> Technique > Three Light Setup
> Fill Light
|
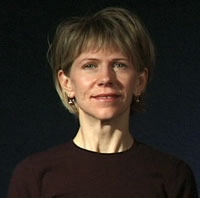
KEY plus FILL: Notice how the left
side of her face (your right) is no
longer completely dark. The fill light
has filled in the shadows. Importantly,
the light is NOT even across her face.
The side with the fill light is not
as bright as the side with the key.
|
|
|
To
fill in that dark area opposite the key, we use a second
light called the "fill." The fill light
is placed exactly like the key (45 degrees over and
45 degrees up) except that it is placed on the other
side. So if the key is on the subject's right, the fill
should be on the left.
The
trick here is to ensure that the fill is NOT as bright
as the key. If both were the same brightness, you'd
have "flat" lighting.
Flat lighting means the light is even everywhere--and
thus everything is more two-dimensional. So if the key
should be less bright than the fill. How much less?
That will vary depending on the scene and your taste,
but at least half as bright. There are at least three
ways to make sure the fill is less bright than the key:
1)You
could use a scrim to cut down the intensity of the fill
light.
2) You could use a fill light with a lower wattage.
3) You could simply move the fill further away from
the subject.
It's
very important that you notice that light is NOT even
across the face. The key side is brighter. The result
is that the face appears more three dimensional--and
that's the point of this whole enterprise. Watch TV
tonight and you will see that nearly EVERY shot you
see replicates this effect to some degree.
|
  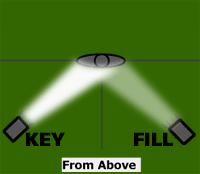
Just
like the key, the fill is 45 degrees
over and 45 degrees up--but it is
on the opposite side. And the fill
is less intense than the key.

|
|
|
|